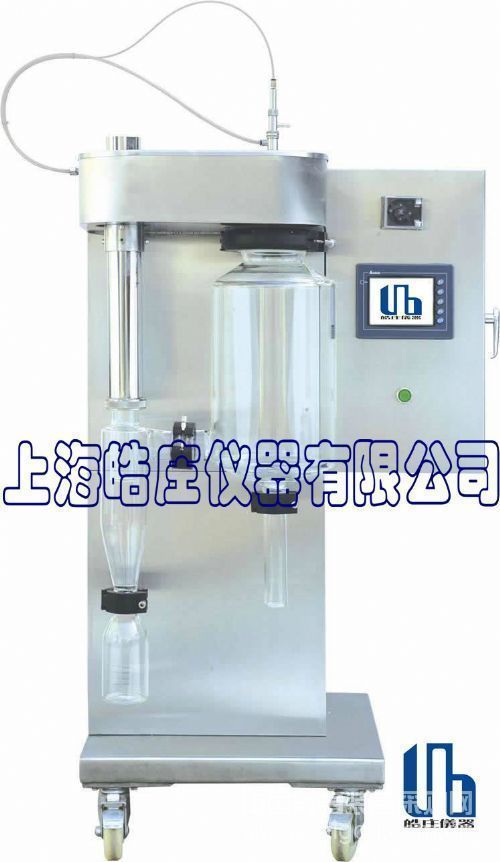
Shanghai Haozhuang Instrument Co., Ltd. has developed a small spray dryer of the brand Hao Zhuang (LNB), which is energy-saving and environmentally friendly, leading the country.
Installation instructions: 1. Installation of the drying chamber Hold the drying chamber with both hands and insert it into the fixing clamp of the drying chamber obliquely, and lock the lock nut of the drying chamber (subject to the rotation of the drying chamber in the clamp).
2. Installation of the cyclone separator Put the lock nut, seal ring and stainless steel gasket of the cyclone separator on the air outlet pipe of the cyclone separator, and then insert it into the air outlet pipe of the equipment together to adjust the air outlet of the drying chamber and the cyclone separator Position the air inlet so that the two ports are aligned straight, connect the two ports with a clamp, and finally lock the lock nut of the cyclone separator.
3. Connect the collection bottle to the cyclone separator with a clamp
4. Connect the collecting tube to the drying chamber with a clamp
5. Install the spray chamber on the device and connect a 4mm trachea (for needle) and a 6mm trachea (for spray)
6. Install the food-grade silicone tube to the peristaltic pump and insert it into the feed port of the spray chamber
Instructions
Peristaltic pump
Click "Open", the peristaltic pump "start", and then click "Stop" to close .. Automatically control the operation of the peristaltic pump, click the blue area of ​​the peristaltic pump automatic button (below) (the button changes to "off"), the peristaltic pump starts automatically , Can automatically adjust the speed of the peristaltic pump according to the setting value of the outlet temperature, so that the feed rate of the peristaltic pump, and then click for manual operation, display "automatic". [1] The fan controls the start and stop of the fan, click the fan button Zone (upper), the fan starts (the button moves to "start"), click below, the fan stops (the button moves to "stop") ... The needle controls the start and stop of the needle, click the black button (upper), By starting (the button moves to "Start"), click below, by stopping (the button moves to "Stop"), the running speed of the needle is changed in the interface (3) by changing the setting value of the needle setting The air compressor controls the start and stop of the air compressor, click on the black area of ​​the air compressor button (above), the air compressor starts (the button moves to "start"), and click the bottom, the air compressor stops (the button moves to "stop" ") The heater controls the start and stop of the electric heater, click the black area of ​​the heater button (upper), the heater starts (the button moves to "start"), and click the lower, the heater stops (the button moves to "stop"). : The heater will not start before the fan is turned on, turn off the fan heater and automatically disconnect. The fan sets the rotation frequency of the extension, press the value box, the numeric keyboard pops up, press the CLR key to clear the number, and then Enter the required value and press the ENTER key to complete the modification. The peristaltic pump manually controls the operation of the peristaltic pump, click the black area of ​​the peristaltic pump automatic button (upper) (display ON), the peristaltic pump automatically starts, the lower display, the peristaltic pump stops (display OFF) Set the running frequency of the needle through the needle. The value means start once every few seconds. Press the value box to pop up the numeric keyboard, press the CLR key to clear the number, then enter the desired value, press the ENTER key to modify .
Peristaltic pump setting Set the feed rate of the peristaltic pump (r / m), press the value box to pop up the numeric keyboard, press the CLR key to clear the number, then enter the desired value, press the ENTER key to modify. Note: Click the control panel to enter the interface (2), click the main menu to enter the interface (1) Inlet air temperature self-adjustment
Adjust the stability of the inlet air temperature. If and only when there is a large fluctuation between the inlet air temperature display value and the inlet air temperature setting value, the inlet air temperature needs to be adjusted automatically to ensure that the inlet air temperature is set. The set value is consistent with the displayed value of the inlet air temperature. Before starting the auto-tuning, the temperature difference between the set value of the inlet air temperature and the displayed value of the inlet air temperature must be more than 50 degrees. The wind temperature is displayed below 70 degrees, that is, the set value> the displayed value is above 50 degrees. Click the black zone (upper) (display ON) of the inlet air temperature self-adjustment button, and the inlet air temperature self-adjustment starts. After the self-discussion is completed, it will automatically end. If the self-adjustment is completed before the self-adjustment is completed, you need to click the end button of the inlet air temperature self-adjustment. Note: After the fan and heater are started, the inlet air temperature self-adjusting function is set. The inlet air temperature setting value sets the inlet air temperature. Press the value box to pop up the numeric keyboard, press the CLR key to clear the number, and then enter the desired , Press ENTER to modify. The inlet air temperature display value shows the actual value of the inlet air temperature. The end of the inlet air temperature self-adjustment is blocked. During the process of the inlet air temperature self-adjustment, if you want to interrupt the self-adjustment halfway, press this button. When the room finds that there is a relatively large fluctuation between the displayed value of the outlet temperature and the set value of the outlet temperature, the outlet temperature needs to be adjusted automatically to ensure that the setting value of the outlet temperature is consistent with the displayed value of the outlet temperature, open the note money It must be ensured that there is a temperature difference of more than 50 degrees between the set value of the outlet temperature and the displayed value of the outlet temperature. For example, if the outlet temperature is set at 70 degrees, the displayed value of the outlet temperature is above 120 degrees, that is, the display value> the set value Above 50 degrees. Set the outlet temperature setting value, press the value box to pop up the numeric keyboard, press the CLR key to clear the number, then enter the desired value, press the ENTER key to modify. The display value of the outlet temperature shows the actual value of the outlet temperature. The outlet temperature self-adjustment ends. When the outlet temperature self-adjustment is in progress, if you want to interrupt the self-adjustment halfway, press this button
FAQ troubleshooting
1. The fan does not work
If the inverter is damaged or the fan is damaged, please contact our company
2. The electric heater does not work
The fan is not started. The solid state relay is damaged. The electric heater is damaged. Start the fan. Replace the solid state relay. Contact our company
3. The air compressor does not work
The intermediate relay is damaged. The air compressor is not started. The air compressor is damaged. Replace the intermediate relay to start the air compressor.
4. The device is dead
The external socket is unreliable. The air switch 1 is damaged in the closed position. Check whether the external power supply has electricity. Turn on the air switch 1 and replace the intermediate relay.
5. No display on the touch screen
The start button on the panel is damaged, replace the start button, the 24V switching power supply is damaged, the touch screen is damaged, replace the switching power supply, please contact our company
6. PLC does not work
Air switch 2 is in the off position, the PLC is damaged, turn on the air switch 2
7. No display of inlet air temperature
PT-100 temperature probe is loosely connected, PT-100 is damaged, PT temperature module is damaged, please contact our company
8. There is no display of the outlet temperature
PT-100 temperature probe is loosely connected, PT-100 is damaged, PT temperature module is damaged, please contact our company
9. The inlet air temperature cannot reach the set value
The fan air volume is too large, modify the fan parameters
10. Dripping material at the bottom of the drying chamber
Inlet air temperature is too low. Atomizing air pressure is too low. Compressed air leakage is too large. Increase the inlet air temperature. Open the rear cover of the device and adjust the pressure to 2-3 Bar (φ6 white air pipe). Pump parameters
11. The needle does not work
The air valve is not open. The pressure is too low. The needle parameter is too large. The solenoid valve is damaged. Open the valve (φ4 white air pipe). Increase the pressure of the pressure reducing valve. Modify the needle parameter. Replace the solenoid valve.
Shanghai Haozhuang Instrument Co., Ltd. strives for survival with quality, development with science and technology, efficiency with management, and credibility with service. Your consultation and purchase are welcome!
Weihai Tong Park Arts & Crafts Co.,Ltd , https://www.whtongpark.com