CAN I LAY PAVING SLABS ON SOIL?
The quick answer is yes, you absolutely can lay paving slabs directly on soil. However, there are several considerations and preparations to take into account before starting your project. We've compiled a comprehensive guide on paving slabs, covering where they can be installed, how to prepare the ground, and practical tips for installation.
Whether you're a seasoned professional or a DIY enthusiast taking on a new challenge, this guide provides the essential tips to ensure your paving slabs are installed correctly.
Before beginning, it's crucial to choose paving slabs that complement the design of your outdoor space. There’s a wide array of options available, allowing you to select based on size, texture, or color preferences. It’s also worth visiting a local patio display to see how the slabs look once installed.
HOW TO LAY PAVING SLABS
The installation process consists of four main stages, each explained in detail below.
1. Planning and Preparation
Once you’ve finalized your design, create a detailed plan of the area, including the layout and measurements.
Before laying the slabs, prepare the area by:
- Marking out the intended area if starting from scratch.
- Removing old slabs if replacing existing ones.
After clearing and marking the area, dig to a depth of about 15cm, ensuring the soil is level and properly compacted.
2. Laying the Sub-base and Preparing the Bedding
Once the initial preparation is done, cover the area with a layer of sub-base material. This layer must be leveled and compacted to guarantee a flat surface.
With the sub-base in place, lay a mortar bedding over it. This serves as a stabilizer and helps prevent weed growth. The bedding should be a mix of 5 parts sand to 1 part cement, forming a 5cm layer on top of the sub-base.
3. Laying the Paving Slabs
Begin by placing the first slab in a corner, aligning it precisely with the markings. This slab will act as a guide for the others. Ensure it is level using a spirit level and gently tap it into the mortar with a rubber mallet.
Continue laying the slabs in the direction of the slope, using spacers between them to create uniform gaps for a tidy appearance.
4. Final Steps
Avoid walking on or placing anything on the patio for at least 24 hours after installation. This allows the mortar to dry and the slabs to settle securely.
The last step involves filling the gaps between the slabs with jointing material. Sand or patio grout works well for this purpose. Smooth the filled gaps and remove any excess material for a clean finish.
AFTER CARE
Maintaining paving slabs is straightforward. Regular sweeping and washing will keep them in excellent condition and prevent algae buildup.
Over time, gaps may form between the slabs. These should be filled promptly, as they can compromise the patio's stability.
NEED HELP?
Explore our full range of paving products to find the right tools for your project. If you're planning a complete landscaping makeover, schedule an appointment with Lords' landscaping designer for expert advice on design and cost estimates.
Remember, while laying paving slabs on soil is feasible, it’s always wise to consult professionals if you’re unsure. They can offer tailored solutions based on your specific needs and environment. Additionally, investing in quality materials can save you time and effort down the line.
Another tip is to consider the drainage of your patio. Proper drainage is key to preventing waterlogging, which can damage your paving over time. Ensuring a slight slope away from buildings can help direct water flow effectively.
If you're working on a larger project, don't hesitate to seek advice from local landscaping experts. Their experience can provide valuable insights into potential pitfalls and how to avoid them. Plus, they often have access to resources and tools that might be challenging to source independently.
Lastly, remember that patience is vital when laying paving slabs. Rushing the process can lead to uneven surfaces or improperly fixed slabs, requiring costly repairs later. Take the time to follow each step carefully, and your patio will look fantastic for years to come.
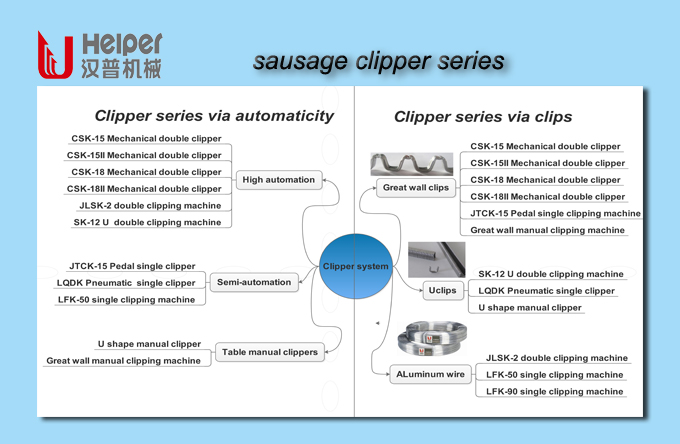
Key words to describe our clipping machines: high-capacity automatic clipper,semi-automatic clipper,single table clipper,automatic double clipper,connected to the filler, for closing sausages in natural or artificial casing with two aluminum clips.
We provide our customers whole clipping machine series, including the automatic double clipping machine, semi-automatic single clipping machine and table manual clippers. Our clipping machines can work well with Great wall shape clips (similar with polyclips R clip series), U shape clips, and aluminum wire directly. Thanks to our professional technical team, our automatic double clippers are featured with neat structure, fast speed, low noisy, easy cleaning and simple maintenance.

Sausage Packaging Machine,Manual Sausage Clipper,Clipping System Solutions,Semi-Automatic Clipper,Single Table Clipper,Automatic Double Clipper
Helper Machinery Group Co., Ltd. , https://www.ihelpergroup.com